-
[유니티 쉐이더 스타트업] Shader Properties 제작해보기프로그래밍/Unity Shader 2019. 4. 28. 17:58
Unity Ver : 2019.1.0.f2 Personal

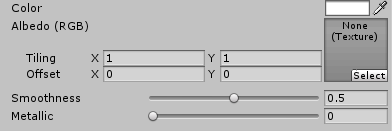
쉐이더를 더블 클릭하면 아래와 같은 코드가 생성된다. Shader "Custom/NewSurfaceShader" { Properties { _Color ("Color", Color) = (1,1,1,1) _MainTex ("Albedo (RGB)", 2D) = "white" {} _Glossiness ("Smoothness", Range(0,1)) = 0.5 _Metallic ("Metallic", Range(0,1)) = 0.0 } SubShader { Tags { "RenderType"="Opaque" } LOD 200 CGPROGRAM // Physically based Standard lighting model, and enable shadows on all light types #pragma surface surf Standard fullforwardshadows // Use shader model 3.0 target, to get nicer looking lighting #pragma target 3.0 sampler2D _MainTex; struct Input { float2 uv_MainTex; }; half _Glossiness; half _Metallic; fixed4 _Color; // Add instancing support for this shader. You need to check 'Enable Instancing' on materials that use the shader. // See https://docs.unity3d.com/Manual/GPUInstancing.html for more information about instancing. // #pragma instancing_options assumeuniformscaling UNITY_INSTANCING_BUFFER_START(Props) // put more per-instance properties here UNITY_INSTANCING_BUFFER_END(Props) void surf (Input IN, inout SurfaceOutputStandard o) { // Albedo comes from a texture tinted by color fixed4 c = tex2D (_MainTex, IN.uv_MainTex) * _Color; o.Albedo = c.rgb; // Metallic and smoothness come from slider variables o.Metallic = _Metallic; o.Smoothness = _Glossiness; o.Alpha = c.a; } ENDCG } FallBack "Diffuse" }오늘 주목해야할 부분은 Properties인데 이곳에서 설정한 값은 유니티 인스펙터에서 아래와 같이 확인할 수 있다.

인터페이스를 만드는 방법
1. Float을 받는 인터페이스
_Name ("display name", Range (min, max) ) = number
_Name ("display name", Float ) = number
_Name ("display name", int ) = number
2. Float4를 받는 인터페이스
_Name ("display name", Color) = (number, number, number, number)
_Name ("display name", Vector) = (number, number, number, number)
3. 기타 Sampler를 받는 인터페이스
_Name ("display name", 2D) = "name" { options }
_Name ("display name", Rect) = "name" { options }
_Name ("display name", Cube) = "name" { options }
_Name ("display name", 3D) = "name" { options }
예제 코드 ( Properties 단락을 붙여넣기 하세요 )
    Properties
    {
		_Brightness ("Change Brightness", Range(0, 1))  = 0.5
		_TestFloat ("Float value", Float) = 0.5
		_TestColor ("Color", Color) = (1, 1, 1, 1)
		_TestVector ("Vector", Vector) = (1, 1, 1, 1)
		_TestTex2D("Sampler", 2D) = "White" {}
    }
Properties가 적용된 걸 확인할 수 있다. '프로그래밍 > Unity Shader' 카테고리의 다른 글
[유니티 쉐이더 스타트업] 색상을 입력 받아 출력해보기 - 2 (0) 2019.05.18 [유니티 쉐이더 스타트업] 색상을 입력받아 출력해보기 - 1 (0) 2019.05.13 [유니티 쉐이더 스타트업] 쉐이더에서 변수는 어떻게 이용할까? (0) 2019.05.11 [유니티 쉐이더 스타트업] 색상의 사칙연산을 해보기 (0) 2019.05.10 [유니티 쉐이더 스타트업] 색상을 출력해보기 (0) 2019.05.03